IKEA outdoor furniture assembly instructions and tips are your secret weapon against patio-project purgatory. Forget the frustration of tangled screws and mismatched parts – this guide will transform your outdoor furniture assembly from a chaotic nightmare into a surprisingly satisfying experience. Prepare to laugh, learn, and finally conquer those wobbly tables and chairs. This comprehensive guide will walk you through the whole process, from initial planning to the final safety precautions.
We’ll cover everything from understanding those cryptic assembly instructions to troubleshooting common issues, like a stubborn screw or a lost piece. You’ll discover clever time-saving strategies, plus pro tips for working with others. Plus, we’ll equip you with the safety knowledge to prevent potential hazards. Get ready to unleash your inner IKEA furniture master!
Introduction to Outdoor Furniture Assembly: IKEA Outdoor Furniture Assembly Instructions And Tips
Transforming flat-pack furniture into fabulous outdoor lounging spots can feel like a Herculean task, especially when the sun’s beating down and the mosquitos are buzzing. IKEA outdoor furniture, while stylish and affordable, often requires a bit of a “Zen and the Art of Assembly” approach. But fear not, fellow furniture fanatics! This guide will demystify the process and equip you with the tools and tricks to conquer your outdoor furniture assembly with confidence and minimal swearing.The allure of IKEA’s outdoor furniture lies in its affordability and design.
However, the “flat-pack” nature can present challenges. Following the assembly instructions meticulously is paramount to avoid costly mistakes and ensure your new outdoor furniture lasts for years to come. Even small errors can lead to wobbly tables, precarious chairs, and a general sense of outdoor furniture catastrophe.
Challenges of IKEA Outdoor Furniture Assembly
Outdoor furniture assembly presents specific challenges. The elements can wreak havoc on the delicate components, leading to rusted bolts, warped wood, and a general sense of frustration. Wind, rain, and even fluctuating temperatures can make assembly more complicated than expected. Additionally, some components can be small and fiddly, leading to dropped screws and misplaced parts. Misinterpreting the instructions can also cause problems.
It’s important to carefully review the assembly instructions before starting.
Importance of Following Assembly Instructions
Thorough adherence to the assembly instructions is crucial. A seemingly insignificant step can have a profound impact on the final product’s stability and longevity. Skimming the instructions or rushing through the process can lead to poor quality assembly, resulting in furniture that’s prone to collapse or shifting. Following each step with precision and care is key to achieving a strong, reliable, and aesthetically pleasing outdoor space.
Common Mistakes During Assembly
Improper tools can lead to damaged components and frustration. Using the wrong tools can cause stripped screws, bent parts, or even damage to the furniture itself. Overtightening bolts is another common error, potentially leading to broken components. Rushing through the process without carefully examining the instructions is a significant pitfall. A common mistake is failing to check the fit of components before tightening them.
This can result in loose joints or misaligned pieces. Ignoring the use of pre-drilled holes can lead to splintering or damage.
Pre-planning the Assembly Process
Pre-planning the assembly process can dramatically reduce stress and potential errors. Laying out all the components on a clean surface, carefully examining the instructions, and gathering all the necessary tools beforehand are key steps. This approach minimizes on-the-spot confusion and ensures a smoother, more organized assembly process. Consider the location where the furniture will be placed and how the pieces will be arranged.
Essential Tools for IKEA Outdoor Furniture Assembly
Careful tool selection is vital for a smooth assembly process. The right tools can make the job easier and prevent damage to the furniture. The table below Artikels essential tools and their frequency of use during a typical assembly.
| Tool | Description | Image Description | Frequency of Use |
|---|---|---|---|
| Phillips Head Screwdriver | Used for tightening and loosening screws with a Phillips head. | A standard Phillips head screwdriver, typically with a handle. | High |
| Allen Wrench Set | Used for tightening and loosening screws with an Allen head. | A set of Allen wrenches of various sizes. | Medium |
| Level | Used to ensure the furniture is level. | A standard bubble level. | High |
| Measuring Tape | Used for measuring distances and ensuring accuracy. | A flexible measuring tape. | Medium |
| Hammer | Used for driving in nails, if needed. | A claw hammer. | Low |
Understanding IKEA Outdoor Furniture Assembly Instructions
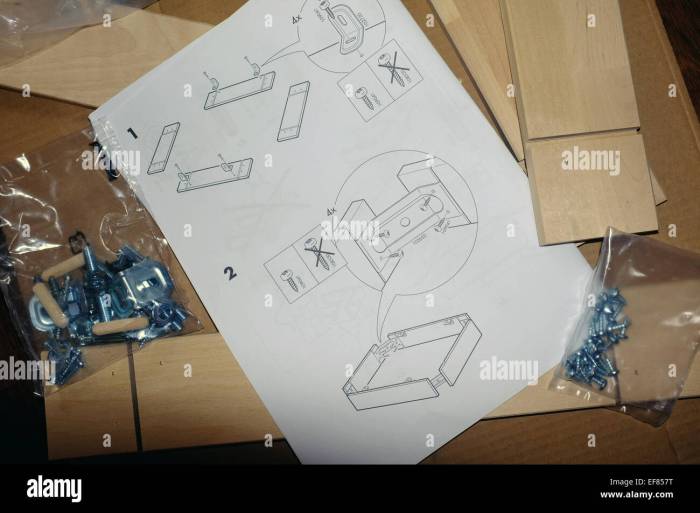
IKEA’s outdoor furniture assembly instructions, while often charmingly cryptic, are actually designed to be decipherable. Think of them as a delightful puzzle, a Scandinavian-style treasure hunt, where the reward is a beautifully assembled patio set. Armed with a little patience and a dash of IKEA-inspired humor, you’ll be crafting your outdoor oasis in no time.These instructions aren’t just a list of steps; they’re a visual guide, a symphony of symbols, and a testament to the brilliance of minimalist design.
Mastering their language unlocks a world of patio possibilities.
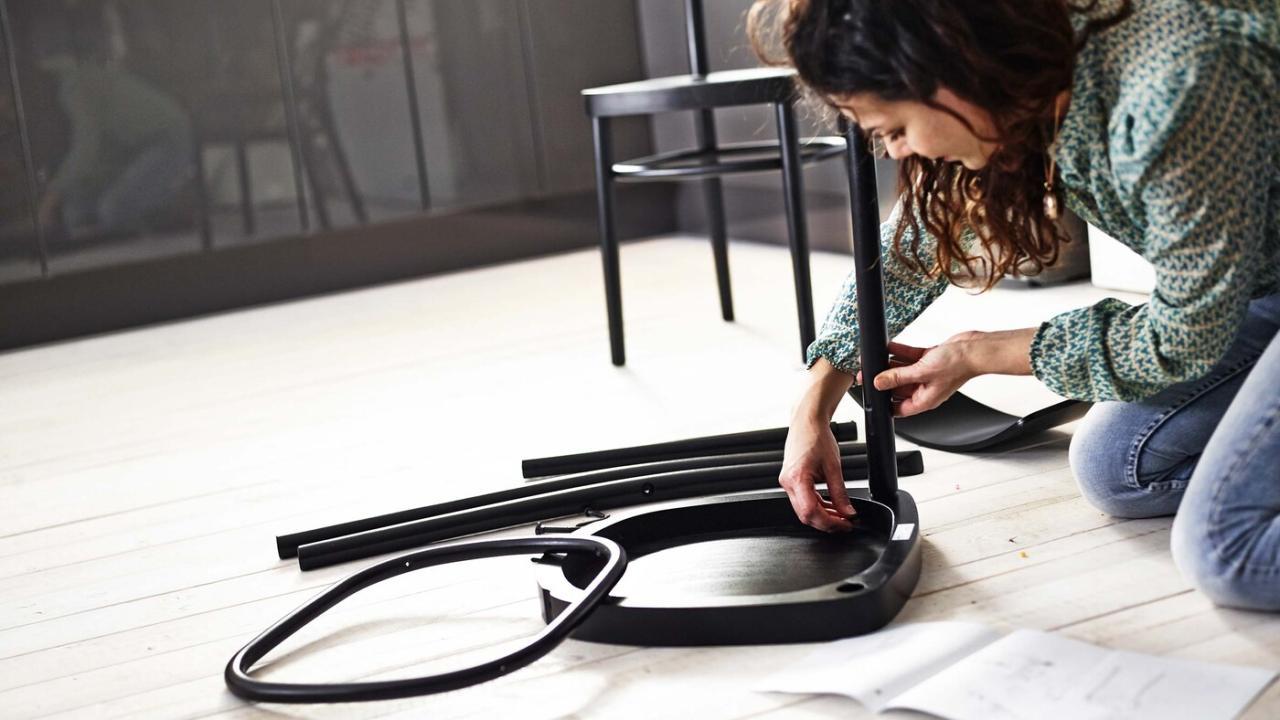
Key Steps in Assembling a Table and Chairs Set
Understanding the assembly sequence is paramount to a smooth, successful project. The instructions typically begin with the foundational elements, progressing to the table top and finally the chairs, ensuring a sturdy and aesthetically pleasing result. A typical assembly sequence for a table and chairs set might start with attaching the legs to the frame, then attaching the tabletop, and finally assembling the chairs.
This order is crucial, as each component builds upon the preceding ones.
- Begin by meticulously identifying the various components. Each part is labeled and often includes a color-coded identification for ease of assembly. A visual inventory, often in the form of a diagram, is included to assist with part recognition.
- Carefully study the diagrams and numbered instructions to understand the step-by-step assembly process. This is often visualized in diagrams with numbered steps for each action. A diagram with arrows illustrating assembly sequences is a common visual cue.
- Thoroughly check all hardware (screws, bolts, etc.) and ensure you have everything needed. This crucial step prevents frustration and delays later on. Don’t just count parts, verify that the sizes and types match the ones in the instructions.
- Follow the instructions meticulously. Each step has a specific order and should be followed with precision. A common mistake is skipping a step, or doing steps out of order.
Visual Cues and Symbols
IKEA instructions are a language of symbols. They use diagrams, illustrations, and often, humorous visual aids to guide you through the process. Understanding these visual cues will greatly enhance your assembly experience.
- Diagrams: These are essential for understanding the layout and structure of the furniture piece. They clearly depict how different parts fit together. Expect various diagrams to visualize different angles and components.
- Numbered Steps: Each step in the assembly process is meticulously numbered, indicating the correct order for assembling the furniture. This step-by-step approach is a key to success.
- Color-Coding: Color-coding can be used to differentiate parts, making identification and assembly easier. This is especially helpful for intricate pieces with many similar components.
Significance of Correct Hardware
The right hardware is crucial for a sturdy and long-lasting piece of outdoor furniture. Using the wrong hardware can lead to a wobbly table, loose chairs, and a generally unsatisfactory outcome.
- Matching Screws: Ensure the screws you use match the specifications Artikeld in the instructions. Using the wrong screw type or size can result in stripped holes or damage to the furniture.
- Torque: The instructions may specify the required torque for tightening screws. Using a screwdriver or wrench with a torque setting is recommended for optimal results. Ignoring torque specifications can result in issues with durability.
- Durability: Invest in quality hardware. This ensures that the furniture will withstand the elements and maintain its structural integrity over time. This will avoid potential damage or failure.
Checking the Parts List Against the Instructions, IKEA outdoor furniture assembly instructions and tips
A crucial step before beginning assembly is to cross-reference the parts list against the assembly instructions. This proactive approach will save you from unnecessary frustration.
- Verification: Carefully compare the parts list against the assembly instructions to ensure all necessary components are present. This meticulous check avoids missing parts, leading to a smooth assembly.
- Completeness: Ensure every part is accounted for, and that all measurements and specifications match. This will avoid surprises during the assembly process.
Comparison of Assembly Methods
Different methods can affect the assembly time and the final outcome.
| Method | Steps | Advantages | Disadvantages |
|---|---|---|---|
| Traditional Method | Following the numbered steps in the instruction manual | Straightforward, reliable approach. | Potentially time-consuming, can be tedious for some. |
| Modular Method | Assembling components separately and then joining them. | Potentially faster, good for those who like a more structured approach. | Can be more complex to understand, may require more space. |
Common Assembly Issues and Solutions
Assembling IKEA outdoor furniture can be a delightful adventure, but sometimes, those perfectly-packaged flat-pack pieces can feel like they’ve been through a cosmic blender. This section will equip you with the knowledge to tackle those common assembly annoyances with grace and a dash of IKEA-approved humor. Let’s get those patio cushions plumped and those tables set, without needing a PhD in particle physics.
Identifying Potential Assembly Pitfalls
Mismatched holes, stubborn screws, and parts that seem to defy gravity are all part of the outdoor furniture assembly experience. A little foresight and a healthy dose of patience can help you avoid these common pitfalls. Understanding the potential issues will help you troubleshoot problems efficiently and avoid unnecessary frustration. Prepare for the unexpected; it’s part of the IKEA outdoor furniture assembly experience.
Solutions for Common Assembly Problems
Don’t let a few misplaced screws or a missing bolt derail your outdoor furniture dreams. We’ve compiled some practical solutions to help you navigate these common assembly woes. The key is to stay calm, be systematic, and remember that even the most experienced IKEA assemblers have experienced their share of challenges. Here’s a table that provides a helpful overview:
| Problem | Solution | Tools Needed | Steps |
|---|---|---|---|
| Loose Screws | Use a screwdriver with the correct bit size and apply firm, even pressure. Consider using a drop of wood glue (if appropriate for the material) to further secure the screw. | Screwdriver (correct bit), wood glue (optional) | 1. Identify the loose screw. 2. Ensure the screwdriver bit is properly aligned. 3. Tighten the screw firmly. 4. If using glue, apply a small drop to the screw threads and allow to set. |
| Mismatched Parts | Carefully review the assembly instructions. Look for corresponding numbers or symbols on the parts. If in doubt, consult the IKEA website or contact customer service. | Assembly instructions, possibly a magnifying glass | 1. Compare all parts to the diagrams in the instructions. 2. Verify the part numbers or symbols align. 3. Check the IKEA website for a more detailed view of the components. 4. If still unsure, contact IKEA support. |
| Parts that Won’t Fit | Double-check the instructions. Ensure the parts are the correct size and shape. If you still have issues, examine the part closely for any damage or deformities. | Assembly instructions, magnifying glass (optional) | 1. Re-read the instructions, checking for any overlooked details. 2. Carefully inspect each part. 3. If there’s visible damage, contact IKEA support. |
| Missing Parts | Contact IKEA customer service immediately to request replacements. If you’ve already paid for the product, they should help expedite the process. | Phone or computer with internet access | 1. Document the missing parts. 2. Call or email IKEA support, outlining the missing components and order number. 3. They’ll guide you through the replacement process. |
Correct Measurement and Marking of Furniture Pieces
Accurate measurements and markings are crucial for a successful assembly. A little bit of planning goes a long way in preventing frustration. Always double-check your measurements to avoid any surprises.
Properly measuring and marking ensures precise alignment and a sturdy structure.
Tips and Tricks for Efficient Assembly
Transforming your IKEA outdoor furniture from flat-pack frustration to fabulous furniture is easier than you think! With a little planning and these clever tips, you’ll be relaxing on your new patio set in no time, instead of wrestling with wobbly legs and tangled screws. Embrace the challenge, and let’s conquer those assembly instructions!
Time-Saving Strategies
Tackling a large outdoor furniture project can feel daunting, but strategically breaking down the assembly process can save you precious time and sanity. Start by gathering all the necessary components – screws, bolts, Allen keys, and anything else listed in the manual – in one central location. This prevents the frantic search for missing pieces during crucial assembly phases.
Also, pre-drill holes if required. This significantly reduces the risk of stripping screws and saves time on tedious tightening.
Working with Multiple People
Assembling furniture with a team can be a blast (literally!), as long as everyone understands their roles. Assign specific tasks to each person based on their strengths – one person could focus on attaching the legs while another handles the seat cushions. Establish clear communication channels, using simple hand signals or a shared document, to ensure everyone is on the same page and avoids any overlapping or conflicting actions.
This ensures a coordinated and efficient assembly process.
Optimizing the Workspace
A well-organized workspace is key to a smooth assembly process. Clear a large, flat area away from potential hazards like power cords or pets. Use a sturdy table or workbench to lay out all the components. Having a well-lit area also helps to avoid mistakes. A good tip is to use painter’s tape to mark the location of screws and bolts on the furniture frame before starting assembly.
Using Visual Aids
The IKEA assembly instructions are usually quite comprehensive, but visual aids can significantly improve the understanding of the process. Consider using a large sheet of paper to create a visual representation of the assembly sequence. Draw the steps or use diagrams from the manual to guide your assembly. Another way to improve visualization is to take photos of the assembly process to have a visual record.
This can be extremely helpful if you need to troubleshoot a problem or repeat the process at a later date.
Maintaining Outdoor Furniture
Maintaining your newly assembled outdoor furniture will ensure it lasts for years to come. To prevent rust, clean the metal parts regularly with a damp cloth. Use a sealant or weather-resistant spray to protect the wood or plastic parts from the elements.
- Regular cleaning and maintenance prevent rust and mildew buildup.
- Avoid leaving furniture in direct sunlight for prolonged periods to prevent fading and cracking.
- Protect the furniture from harsh weather conditions using covers.
- Use appropriate cleaning agents to maintain the original look and feel of the furniture.
- Store the furniture in a sheltered area during the winter months to protect it from extreme cold and dampness.
Safety Precautions During Assembly

Transforming your outdoor oasis from flat-pack to fantastically functional requires more than just muscle; it demands meticulous safety. Ignoring these precautions can lead to a furniture-related fiasco, turning your patio project into a painful reminder that sometimes, less is more…and definitely more secure. So, let’s equip ourselves with the know-how to assemble your new outdoor furniture like seasoned pros, without ending up in a casualty ward.Proper safety measures are paramount when handling tools, materials, and even the assembled furniture itself.
Remembering these simple steps will ensure your assembly project is a success story, not a cautionary tale.
Essential Safety Gear
A well-equipped workshop is a safe workshop. Appropriate safety gear is not just a suggestion; it’s a fundamental requirement. Think of it as your personal shield against potential mishaps.
- Safety glasses or goggles are a must-have to protect your eyes from flying debris or errant screws.
- Gloves protect your hands from cuts and abrasions, ensuring a comfortable and injury-free assembly process. Think of them as your hand’s personal armor.
- Work boots or sturdy shoes provide ankle support, vital for stability, especially on uneven surfaces. Preventing a slip-and-fall scenario is crucial.
Tool Handling and Material Management
Handling tools and materials with care is a straightforward strategy to avoid injuries.
- Always inspect tools for damage before use. A chipped hammer or a bent screwdriver can easily lead to accidents. Make sure your tools are in top condition.
- Use the right tool for the right job. Trying to use a screwdriver to pry open a stubborn package could result in a damaged screwdriver and a frustrated you. Match the tool to the task.
- Keep work areas tidy and organized. A cluttered workspace is a recipe for disaster. Clear the area of any unnecessary items, and organize your tools for quick access.
Safe Handling and Storage of Assembled Furniture
Assembling the furniture is only half the battle; ensuring its safe handling and storage is equally important.
- Ensure the assembled furniture is stable and secure before using it. A wobbly outdoor table can quickly turn into a hazardous situation. Double-check for stability.
- Use appropriate lifting techniques when moving the assembled furniture. Lifting with your back straight and your legs bent is crucial for preventing injuries. Avoid straining your back.
- Store the furniture in a safe and dry location, away from direct sunlight and extreme temperatures. Protecting your investment is important. Prevent moisture damage or fading.
Potential Hazards and Prevention
Accidents happen, but they don’t have to. Planning ahead is key to minimizing potential hazards.
| Hazard | Description | Prevention | Safety Gear |
|---|---|---|---|
| Falling objects | Loose screws, bolts, or other components can fall during assembly, potentially causing injury. | Secure all parts during assembly. Use appropriate clamping devices or secure the parts with tape or other suitable methods. | Safety glasses, gloves |
| Cuts | Sharp edges or components can cause cuts or lacerations. | Use appropriate protective gloves. Handle components carefully and avoid putting yourself or others in harm’s way. | Gloves, safety glasses |
| Spills | Spilled liquids or tools can cause slips and falls. | Work on a stable surface. Use absorbent materials to clean up spills immediately. | Work boots/sturdy shoes |
| Strain | Lifting heavy components or awkward positions can lead to muscle strain or injury. | Use proper lifting techniques. Request assistance if necessary. Break down the assembly process into manageable steps. | Gloves, work boots |
Advanced Assembly Techniques
So, you’ve conquered the basics, mastered the Allen wrenches, and are now ready to tackle the IKEA furniture Everest? Good on ya! This section delves into the more sophisticated strategies for assembling those tricky outdoor pieces. Think of it as the “pro” level of IKEA assembly – where you’re not just putting things together, you’re crafting a masterpiece, one perfectly-aligned leg at a time.Advanced assembly often involves understanding the furniture’s design beyond the simple instructions.
This means anticipating potential challenges and employing the right tools and techniques to overcome them, transforming a seemingly insurmountable task into a satisfying achievement. Let’s get started with the next level!
Specialized Tools for Difficult Tasks
Certain IKEA outdoor pieces present unique challenges that call for specialized tools. Instead of resorting to brute force (which can lead to broken parts and bruised egos), consider the power of the right tool. Knowing which tool to use for which job can make the difference between a smooth assembly and a frustrating battle.
- Precise Alignment Tools: For complex joints or intricate designs, using a level, measuring tape, or even a carpenter’s square ensures precise alignment. This prevents mismatched holes and ensures your furniture stands tall and proud. Think of it as creating a framework of precision that will guide the rest of the process.
- Specialized Wrenches: Different IKEA outdoor furniture sets often utilize various Allen wrench sizes. A set of quality Allen wrenches will be a lifesaver when dealing with intricate designs. This prevents stripped screws and ensures a smooth, trouble-free assembly. Always check the specific wrench sizes listed in your instructions for the best results.
- Clamps and Support Brackets: For larger pieces or those with multiple components, using clamps or support brackets to hold parts in place during assembly can be crucial. This prevents unwanted movement and ensures that everything stays aligned and secure while the glue or fasteners dry.
Understanding the Furniture’s Design
Don’t just read the instructions; study them! Understanding the specific design of the furniture piece is key to successful assembly. Analyze the different parts, how they connect, and the overall structure. Imagine the furniture as a puzzle, where each piece has a specific role to play.
- Identify Key Components: Take note of the various components, their specific functions, and their relationship to each other. This will help you visualize the final product and anticipate potential issues during assembly. Visualize the assembled piece in your mind, before even beginning the assembly.
- Analyze the Connections: Examine the types of connections used (screws, bolts, clips, etc.). Understanding how each part connects with another will help you anticipate any potential issues or challenges. Note any unusual connections or specific steps in the assembly instructions.
- Review the Overall Structure: Consider the overall structure of the furniture. How do the different components interact to create the final product? This will help you understand the forces at play during assembly, allowing you to assemble the furniture properly and ensure its longevity.
Troubleshooting with the Assembly Guide
The IKEA assembly guide often includes a troubleshooting section. Don’t skip this section! It’s a treasure trove of solutions to common problems. This section acts as a second line of defense in case you encounter unexpected obstacles.
- Search for Specific Problems: If you encounter a problem, carefully read the troubleshooting section of the guide. Often, there’s a solution for exactly the issue you’re facing.
- Refer to Diagrams: The troubleshooting section often includes diagrams that illustrate potential problems and their corresponding solutions. These visual aids can be immensely helpful in understanding the cause of the issue and how to correct it.
- Don’t Hesitate to Contact Support: If you’ve exhausted all other options, don’t hesitate to contact IKEA customer support for assistance. They can provide additional guidance and support to help you overcome any assembly challenges. They’re there to help you succeed!
Assembly Guides for Specific IKEA Outdoor Furniture Pieces
Ever feel like your IKEA furniture assembly is more like a cryptic code-breaking mission than a straightforward process? Fear not, fellow outdoor furniture enthusiasts! This section will demystify the assembly of your favourite IKEA outdoor pieces, transforming those daunting instructions into a fun and manageable adventure.This section provides detailed assembly guides for common IKEA outdoor furniture, including sofas, dining tables, and benches.
We’ll break down the process into manageable steps, offering visual aids to make the whole experience a breeze. Prepare for a step-by-step journey, free from frustration, and ending in a beautifully assembled outdoor oasis!
IKEA “Sunstrand” Outdoor Sofa Set Assembly
This guide details the assembly of the “Sunstrand” outdoor sofa set, a popular choice for those seeking stylish and comfortable outdoor seating. Imagine relaxing on your brand new sofa, enjoying the sun and a good book, knowing it was assembled with ease.
- First, carefully unpack all components, ensuring you have all the necessary parts. Check the packaging against the instructions to avoid any missing pieces, a potential source of significant frustration later on.
- Assemble the legs by carefully attaching them to the frame using the included screws. Ensure a secure fit, avoiding any gaps or misalignment. Tightening the screws should be a gentle dance of precision, not a hammering contest.
- Attach the cushions to the seat and back frames. Follow the designated placement instructions. Be sure to align the cushions properly and secure them using any straps or clips.
- Check all connections for stability and security. A wobbly sofa is no fun. Thoroughly check all screws and attachments, ensuring they are tightly fastened.
- Finally, arrange the sofa pieces according to your preference and enjoy your newly assembled outdoor furniture!
IKEA “Höst” Outdoor Dining Table Assembly
Assembling the “Höst” outdoor dining table is easier than you think.
- Carefully lay out all the table components on a flat, stable surface. This will help you visualize the assembly process and avoid unnecessary confusion.
- Assemble the table legs to the table top by carefully inserting the connecting pins. Make sure you align the legs correctly for a stable structure.
- Secure the table legs with the provided screws. Tighten the screws firmly, ensuring a secure and stable connection.
- Verify that the table is level and stable before use. A level table is a happy table. Use a spirit level if necessary.
- Finally, admire your newly assembled dining table, ready for outdoor gatherings!
IKEA “Strandmon” Outdoor Bench Assembly
Transforming the “Strandmon” outdoor bench from a collection of parts into a cozy seating option is straightforward.
- Begin by carefully unpacking all components and matching them to the diagrams in the instructions. This meticulous first step will help avoid frustration later on.
- Assemble the bench frame by connecting the slats and supports as shown in the illustrations. Ensure all connections are secure and properly aligned.
- Attach the seat to the frame using the provided hardware. Ensure the seat is properly aligned and secured for optimal comfort.
- Check the overall stability of the bench. A wobbly bench is not a happy bench. Thoroughly examine the connections.
- Place the bench in your desired location and enjoy its new presence in your outdoor space!
Comparison of Assembly Processes
| Piece 1 | Piece 2 | Common Steps | Differences |
|---|---|---|---|
| IKEA “Sunstrand” Outdoor Sofa | IKEA “Höst” Outdoor Dining Table | Unpacking, checking components, securing connections | The sofa requires assembling cushions, while the table involves attaching legs. The sofa uses straps/clips, while the table uses pins and screws. |
| IKEA “Sunstrand” Outdoor Sofa | IKEA “Strandmon” Outdoor Bench | Assembling frames, securing connections | The sofa involves cushions and back frames; the bench uses slats and supports. The sofa uses straps/clips, while the bench uses different hardware. |
Conclusion
So, there you have it – your complete, hilarious, and highly practical guide to conquering IKEA outdoor furniture assembly. Armed with this knowledge, you’ll be assembling your dream patio set with the confidence of a seasoned pro, all while avoiding potential pitfalls and enjoying the process. Remember to prioritize safety, embrace the learning curve, and most importantly, have fun with it! Your patio will thank you.